Robotic cleaning fleet
Sizing the number of cleaning robots a plant needs, and deciding gap by gap where a supported bridge will be installed.
🤖 Robotic Module Cleaning sizes the cleaning fleet: how many robots the plant needs to cover every module. It works from the layout you have placed, so the answer reflects the real geometry — where the control rooms landed, where the arresters sit, where obstructions broke the rows — rather than a rule of thumb applied to a capacity figure.
The output is a count you can procure and price against. It reaches the bill of materials, so it is also the point at which a cleaning system stops being an assumption in the loss table and becomes a line item.
Where it is
The button is the second of three in the Studies card on the Tools tab, between 🔆 Simulation with AC Capacity and 🌓 Shadow View (row spacing). Like the rest of the tab it is greyed out until a layout exists, because the count is measured off the placed layout.
Before you size the fleet
More than generating the layout: settle the equipment that breaks the rows before you start ticking gaps, because that equipment is what creates most of them.
| Decide first | Why it matters here |
|---|---|
| Lightning arresters | On a fixed-tilt plant an arrester footprint sits in the row and produces a gap blocked by equipment. Placing them later changes the gap list |
| Control rooms and unit substations | Every building footprint clears tables around it and interrupts the lines that ran through it |
| Obstructions you draw by hand | Each one breaks the rows it crosses, so each one can add segments |
| Half tables and Maximize placement | Both change how rows are packed, and a staggered plant has a different set of gaps from a gridded one |
If any of those change afterwards, open the window again. The gap list is a measurement of one particular layout, not a property of the site.
How a robot moves
A robot drives along the module frames of one cleaning line. The frames are its track: it travels the continuous run of structure, cleaning the modules it passes, and it can only go where that run continues.
That is why the direction of a cleaning line is not a setting but a consequence of the mounting type. The window's strip states it for the design you are in.
The strip reads robots travel west–east along each table row. Rows of MMS tables run east to west, so the continuous run of frames along a row is the east–west direction, and a line follows one row of tables across the plant.
In both cases the rule is the same — the line follows the frames — and the two answers differ only because the frames run differently. A robot cannot cross from one line to the next; each line is its own track.
The window
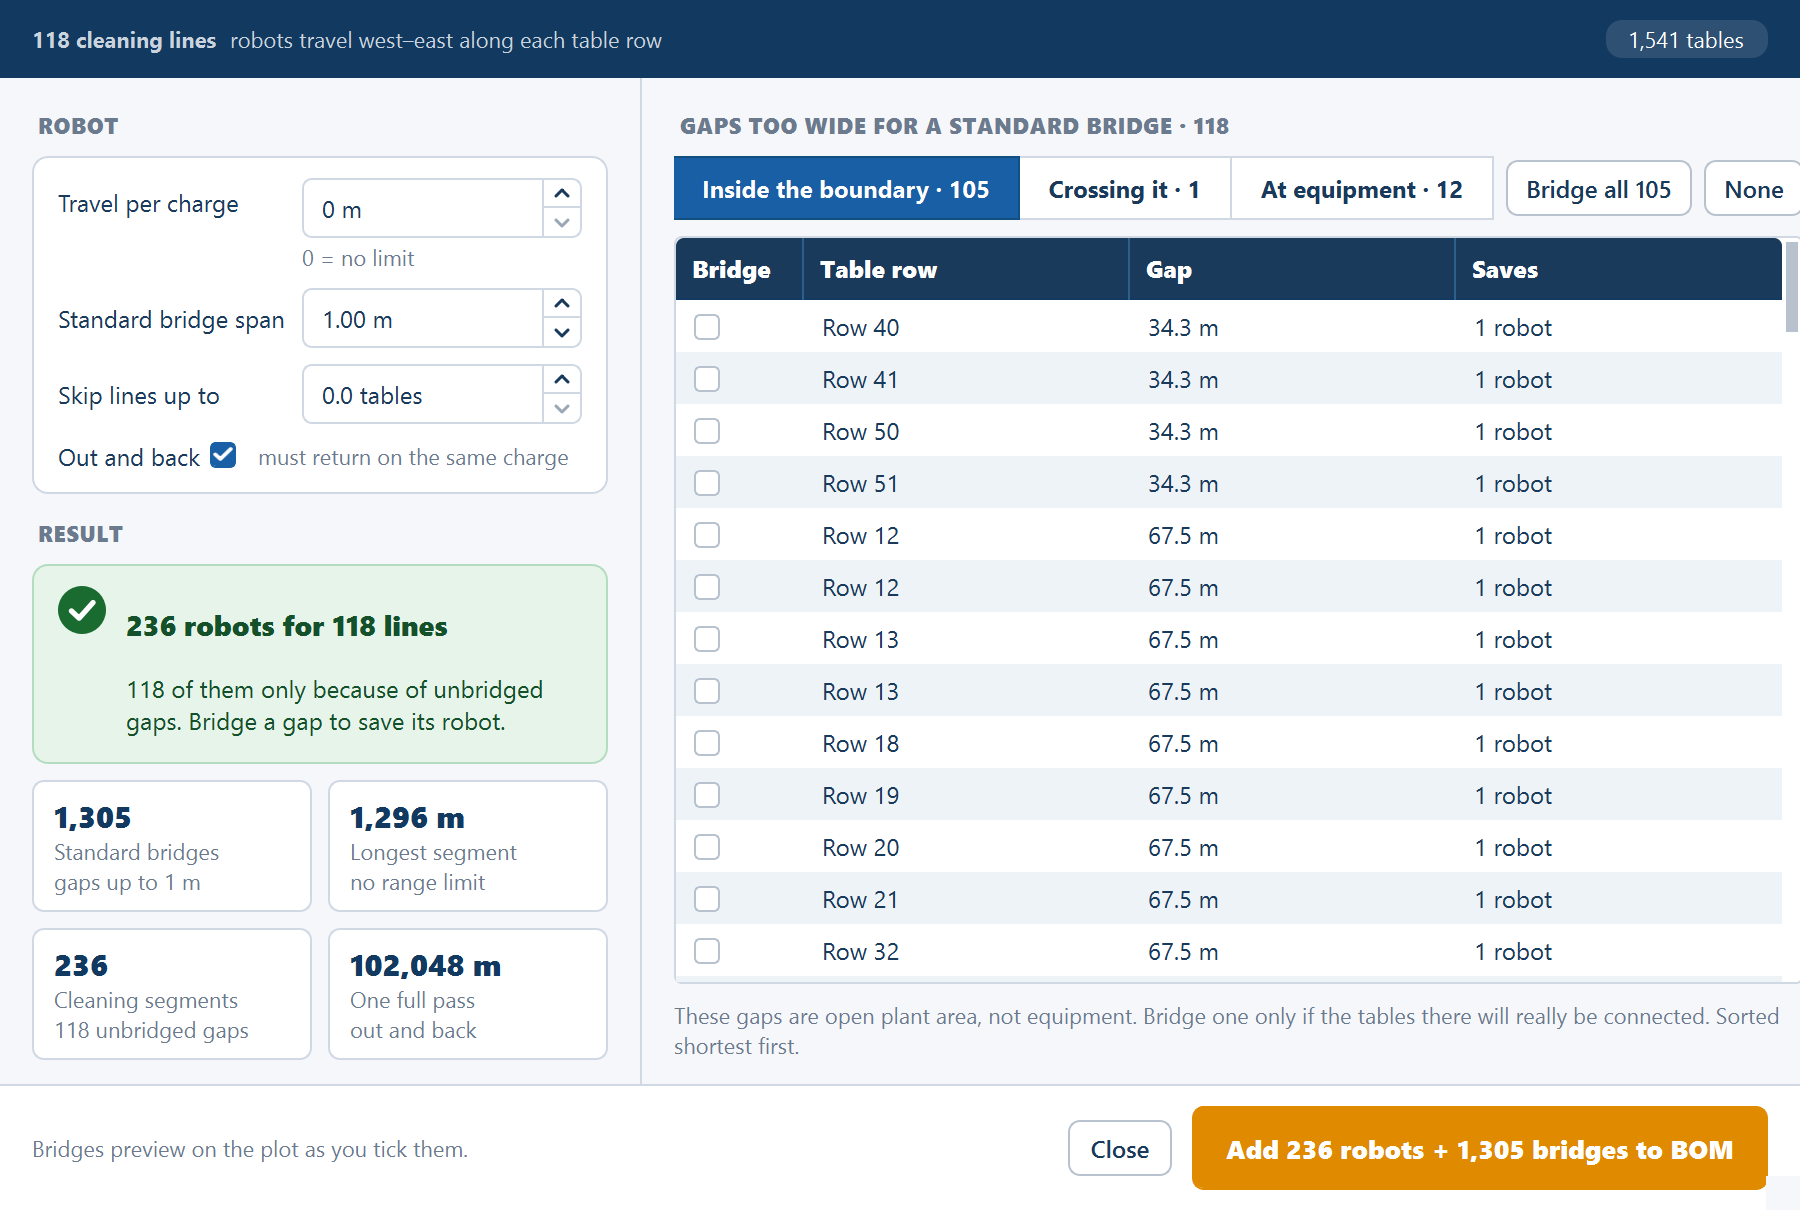
Robotic module cleaning opens as one window, and it can be maximised for a long gap list. Across the top a strip reports n cleaning lines, the direction of travel, and a chip with the table count. The inputs and the result sit on the left; the gaps on the right; the action in the footer.
ROBOT
Four fields. On a tracker plant the unit reads "trackers" instead of "tables".
| Field | Default | What it does |
|---|---|---|
| Travel per charge (m) | 0 — the hint reads 0 = no limit | How far a robot travels on one charge |
| Standard bridge span (m) | the gap already configured | The widest gap a robot crosses unaided, on the plant's own standard bridge |
| Skip lines up to (tables or trackers, in steps of 0.5) | 0 | A line carrying this many units or fewer gets no robot |
| Out and back — must return on the same charge | ticked | Doubles the distance a robot has to cover, because it travels its segment twice |
Travel per charge ships at 0, so out of the box there is no battery constraint at all and every cleaning segment gets one robot. That is the right setting when you are sizing on geometry alone, or when the system you are pricing is continuously powered. Enter a real range and it becomes a second reason for the fleet to grow, on top of broken lines.
Out and back ships ticked, and it halves the effective reach, because the robot travels the segment twice. Leave it ticked unless the cleaning system genuinely supports a charging point or a swap at the far end of a line.
Standard bridge span starts from your own geometry rather than a constant, so it is consistent with the layout on first open. It is taken from the Gap between MMS-Tables on a fixed-tilt plant, which ships at 1.0 m — see Table configuration — or from the N–S service gap between units on a tracker plant, which ships at 2.0 m; see Tracker configuration. Where that gap is zero the span starts at 2.0 m. Any gap at or under the span is crossed as a matter of course; anything wider is a decision, which is the next section.
Skip lines up to ships at 0, so nothing is discarded until you raise it. It steps in halves because a half unit counts as 0.5 — the section on short segments below covers what raising it does and does not do.
RESULT
A verdict banner gives the answer — n robots for m lines — and a line under it explains where the count came from: "k of them only because of unbridged gaps. Bridge a gap to save its robot." when gaps are costing robots, "One robot per cleaning line." when nothing is broken, or "No robot is lost to an unbridged gap." once every wide gap has been bridged. On a plant with nothing placed it reads "No tables placed".
Four tiles sit under the banner:
| Tile | What it reports |
|---|---|
| Standard bridges | The bridges of the standard span the lines need |
| Longest segment | The longest stretch one robot serves |
| Cleaning segments | How many segments the lines are broken into |
| One full pass | One complete cleaning pass over the plant |
A wide gap is a decision, not an assumption
This is the part of the window that does the real work, and the reason the tool exists rather than a formula.
The right-hand side is headed GAPS TOO WIDE FOR A STANDARD BRIDGE · n, and every such gap in the plant is listed individually, with its measured span and where it is:
| Column | What it holds |
|---|---|
| Bridge | The tick box — your commitment to install a supported bridge there |
| Table row | Which cleaning line the gap is on |
| Gap | Its measured span |
| Saves | What bridging it is worth in robots |
| Blocked by | What sits in the gap — an arrester, a building, an obstruction — or nothing, for a gap in open ground |
A filter above the table narrows the list to Inside the boundary, Crossing it or At equipment, and Bridge all n and None tick or clear the whole list in one click.
Each tick box is a commitment:
- Ticked means you will install a supported bridge across that gap. The robot drives over it, the line stays continuous, and the fleet count drops by the figure in Saves.
- Left unticked means the line is broken there. The stretch on the far side becomes its own segment, and that segment keeps its own robot.
Nothing is bridged unless you tick it. The application will not assume a bridge anywhere, at any span, for any reason. A wide gap is a civil and structural commitment with a cost and a design behind it, and assuming it away would produce a fleet count that quietly depends on structures nobody has agreed to build.
As you tick, the bridges are drawn on the plot behind the window, so you can see where each one lands. A bridge that would leave the site is drawn as a preview only.
The Blocked by column is there because the two kinds of gap are not the same kind of decision. A gap in open ground needs a longer span of the same idea — usually straightforward. A gap blocked by equipment needs a bridge that gets a robot over or around something solid, which may be expensive, may be impossible, and may be a reason to move the equipment instead while the layout is still editable. The At equipment filter shows you only those.
Every tick is a structure someone has to design, buy and install. Tick the gaps you have decided to bridge, not the gaps that would give you a convenient fleet count. Bridge all is there for the case where you genuinely will.
How the fleet is counted
Sizing starts from the simplest possible answer and grows it for two reasons.
One robot per line to start. Each cleaning line gets one robot. On a plant of unbroken rows with no range limit — which is what the shipped Travel per charge of 0 gives you — that is the whole answer, and the verdict says "One robot per cleaning line."
Broken lines add robots. Every unticked wide gap splits a line into segments, and each segment needs its own robot, because no robot can cross the gap to reach the rest of the line. A line broken in two places carries three robots where an unbroken one carried a single robot. The verdict's detail line counts how many robots exist only for this reason.
Travel per charge adds robots. With a range entered, a robot that cannot finish its segment on one charge needs company — the segment is shared between more than one robot. With Out and back ticked, the distance to be covered is the segment travelled twice, so range binds sooner.
The two causes compound: a long line broken into segments may still exceed the range within each segment. That combination is what makes an eyeballed estimate unreliable on a real plant, and it is why the count is worth deriving.
Segments too short to be worth a robot
A segment can be a stub — two tables cut off in a corner by an obstruction. A dedicated robot for it is not a sensible procurement, so Skip lines up to sets a threshold:
A line whose weighted unit count is at or below the threshold gets no robot.
- The count is weighted: a half unit counts as 0.5, so two half tables count the same as one full table. That is why the field steps in halves.
- The field ships at 0, which counts every line however short. Raising it discards more short stubs and lowers the fleet count.
- Whatever the threshold discards still has modules on it. Those tables are not covered by the fleet the count describes, so decide how they will be cleaned — by hand, or by a robot moved there — rather than letting the threshold hide them.
Live recalculation, and where the result goes
Everything in the window recalculates live. Tick a gap and the verdict moves immediately; change Travel per charge or the bridge span and it moves again. Work the list top to bottom, watching the Saves column, and you can see directly which bridges pay for themselves in robots saved.
Start with everything unticked
Because nothing is bridged unless you tick it, the first count you see is the honest baseline: the fleet required if you build no additional bridges at all. Note it before you change anything — it is the upper bound, and the figure every bridge is measured against.
Set the robot inputs before touching the gap list
Travel per charge, Out and back and Standard bridge span all change which gaps are even listed and how long a segment one robot can serve. Settling them first stops you re-deciding the same gaps twice.
Work the open-ground gaps
Filter to Inside the boundary and look at the rows with nothing in Blocked by. These are the cheaper decisions — a longer span of a bridge you are already buying. Tick the ones you will genuinely install and watch the count fall.
Work the equipment gaps last, and sceptically
Filter to At equipment. Each of these needs a bridge that gets a robot past something solid. Some are straightforward, some are not worth building, and some are a reason to move the equipment while the layout is still editable.
Add the fleet to the bill of materials
The primary button in the footer names what it will add — Add n robots + m bridges to BOM. Click it, and the count and the bridges you ticked become materials lines. Close leaves without adding anything.
The result then reaches two places:
- The Summary view. The Cleaning robots row in the SITE group sits with the other equipment counts — see Summary columns.
- The bill of materials. The fleet becomes three lines: the cleaning equipment itself, the standard-span bridges, and the supported-span bridges over arresters, buildings and obstructions — so the ticked gaps are carried as a scope item and not only as a lower robot count.
The bill of materials never carries a fleet you did not ask for. Those three lines appear only after you have run this study and clicked the add button, so a materials list from a plant where you never opened this window contains no cleaning fleet at all — not a zero, not an estimate. If a bill of materials has to include the cleaning system, run this first. See Bill of materials.
The soiling loss in the performance ratio is a separate input that you set, and it is not derived from the fleet — see Loss breakdown. The two belong together in a report, though: a soiling assumption presumes a cleaning regime, and this is where the regime gets counted.
Where to go next
Bill of materials
Where the fleet and its bridges appear as materials lines, and when
Table configuration
The inter-table gap that sets the default bridge span
Sizing from an AC capacity
The first study in the same card, run from a placed layout
Summary columns
The robot count among every other Summary row
Sizing from an AC capacity
Work backwards from a contracted AC capacity and a target DC/AC ratio to a layout capped at the capacity you are allowed to build.
Building the single-line diagram
The SLD view — the A3 drawing sheet, the Generate choice, the drawing tools, and how the finished diagram reaches the project report, a standalone PDF and a CAD file.